Before you can do this quest, you will need to do the Kill the Beggars Quest.
REMEMBER: Once you enter the City of Abandoned Ships, before you go all loot happy raiding all chests and selling what you find, note that you will need some very specific items in order to complete the main quest and leave the city. Make sure to stash these in your chest in the Diffindur or you will not be able to proceed with the main quest: 10 bags of salt, 10 grapes, 3 great wine and 1 lute.
Introduction
Lost Ships City
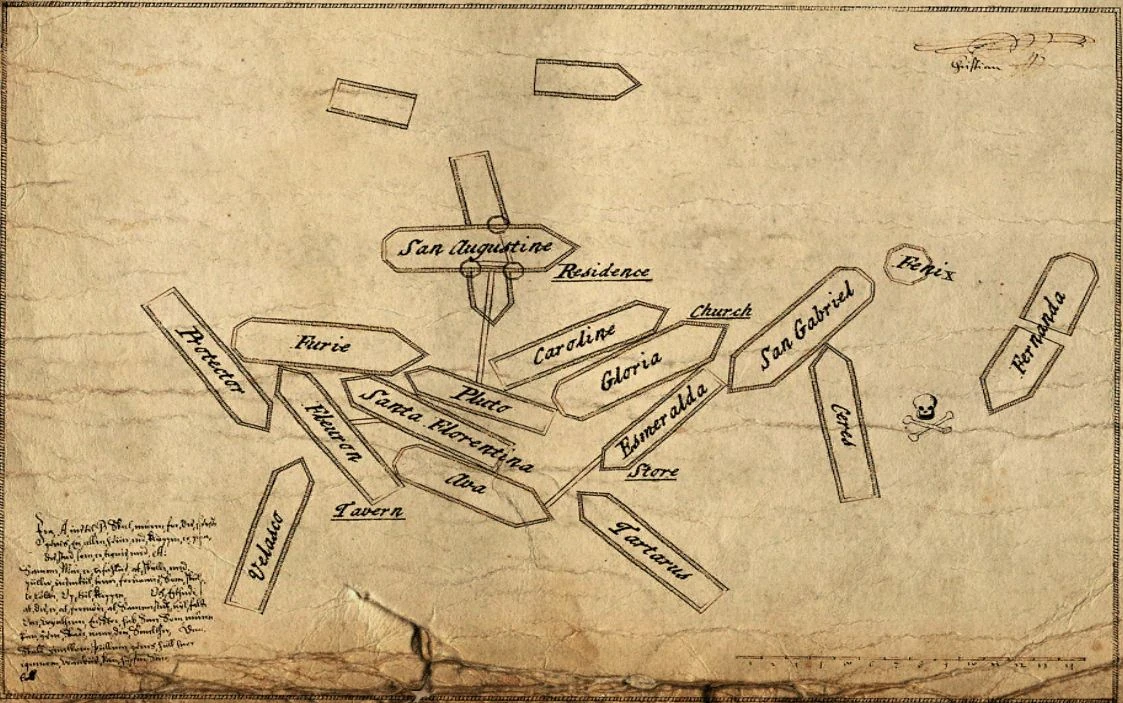
When you enter the city, Mr. Stoker greets you and tells you all about the CoAS. If you brought any items with you that do not wish to lose, you can store them in the chest in the Fernando Diffindur using the key you brought with you. To get to the Diffindur easily, there is a convenient entrance to the water from the deck of the Ceres Smithy and an exit from the water between the bows of the Gloria and the San Gabriel (click on the map above for details). In the middle of the ship is a big crack where you will find this special chest. Take the letter inside and stash all your items inside before talking to Admiral Chad Capper or he will take all your items and belongings. Note that all money stashed inside the chest will disappear!
After stashing your belongings inside the chest, you should visit Admiral Chad Capper (he is most likely on his ship, the San Augustin, or in the Tavern on the upper floor drinking). At this point, you are free to roam around, explore the city, greet the inhabitants, and take back your belongings from the chest. However, it is recommended you go to the store owner first and try and purchase a map of the City of Abandoned Ships so you can find your way around. Of course, when you actually try to buy it from him it will cost 198,000 gold so don't buy it, talk to him about how ridiculous his price is, then go outside the store and talk to Sandra Gomez, who will offer to help you talk to the store owner and reduce the price.
You can also do the side quests at any point now since they can be quite lucrative, but you can also choose to simply continue onward with the main quest. Still, it is recommended to do the side quests first since you will probably have to do some of them anyway for best results.
NOTE: In order to gain the ability to fast travel, you must have at least finished one side quest!
Main Quest
Talk to the tavern owner and ask about Teaser Dan. He will be excited to hear that he escaped and promises to gain information. Wait around 5 days and the tavern owner will have a new dialogue option. It is recommended to go around doing the side quests while waiting for the tavern owner at this point.
After 5 days on the CoAS you can continue the conversation with the bartender about Teaser Dan. You show him the letter you found in the Diffindur chest and he will tell you that Teaser Dan was probably helped by more people. First you'll need to find the carpenter. Talk to him and he tells you to meet at the Protector's cabin. Go to the Protector's cabin and then he appears with a guard. Apparently, the scoundrel has betrayed you to the guard but lucky for you, he hasn't said anything yet to the Admiral. You have to kill them both and once they are dead, return to the bartender. He suggests blaming the incident on one of the clans, the Narwhals. To do so, you need to go to the Velasco's bow and enter the door that's directly opposite the two doors. Once inside, a Narwhal will appear. Kill him and bring his "Narwhal Clan Ring" to the Admiral. When you bring the amulet to the Admiral, he decides to get rid of the whole Narwhal clan and requests you to help him do so. Luckily, he will give you 3 of his militia fighters to help you; they will meet you on the Velasco.
Now, before you go running in and starting the fight, note that the reward you'll get depends of the survival of the 3 fighters you'll lead on the assault.
- All dead: Admiral upset and no reward.
- 1 or 2 dead: Admiral neutral and 10,000 piasters reward.
- All survived: Admiral impressed and 100,000 piasters reward.
You can also clean the Velasco's deck before doing the eradication of the Narwhal Clan. Only 1 of the Clan members will be invulnerable; you can enter and run as a mad-parrot walking down to the lower deck, and fight them in the narrowest spot where some boxes are placed. If you did clean the place before, you only have to kill that one man who will no longer be invulnerable.
In any case, kill them, then go in between the crate and the barrel right in front of you and collect the Average Key. Now report to Admiral Chad Capper, collect your reward, and talk to the bartender about your success in fixing the situation.
Now wait another 5 or so days as the bartender will tell you he needs more time to think.
After 5 days, talk to the bartender again. He will tell you about something weird happening in his tavern and suggest you go to the wine cellar of the tavern and hide while eavesdropping on a conversation of Admiral Capper and someone at night. You must wait until midnight (save before sleeping just in case the time is insufficient for you to enter the wine cellar on time) and go to the wine cellar. Now here comes one of the tricky parts, along with a few bugs.
- To avoid detection, you must hide behind the pillar in the wine cellar. You must be next to the pillar but not facing it; you must be 90° of it, so the column is at your right or left side. This can be tricky so saving in a separate slot before waiting till midnight is crucial!
- There are a few bugs with this quest. There is a chance that you'll bug out and fly through the earth if you load a save with you near the pillar, and if you save while inside the wine cellar, the game will bug out and detect you as missing the meeting. Thus, you must save right outside the wine cellar in order to bypass these 2 bugs. Note that if you did save in the wine cellar and still have some time before midnight, you can simply exit the wine cellar and re-enter to fix this problem.
- If you fail at any of the above points, the Admiral will remark that he thinks that there's someone on the other side of the wall and the conversation will end. If you do this right you'll hear the conversation between Admiral Capper and the chief of the Casper Clan.
If you heard the conversation, apparently they're both planning to make loads of money and sail off the City of Abandoned Ships to the mainland because Admiral Chad Capper wants to be a Governor at any cost and must spend a lot of money in London to do so. Since you indirectly helped them by killing off their competition (the Narwhals), they laugh at your idiocy, though they do not know that you indirectly foiled their plans as well by killing the carpenter and thus rendering them unable to build a ship to leave. They also mention some character called "the Mechanic" along the way and the conversation ends there.
Now, regardless of whether you managed to hear the conversation or not, the quest can still proceed, so return to the bartender and talk to him.
If you managed to hear the conversation, the bartender will tell you that he'll try to find someone who has been in the City of Abandoned Ships longer than he has in order to find out more about "The Mechanic". If you did not manage to hear the conversation, he will remark about him doing a better job and will offer to be the next one to eavesdrop on the conversation instead. Either way, you'll have to wait a few days, and make sure you exit the tavern and re-enter, because...
Surprise! The bartender is now replaced with someone else. Apparently, he was found dead in the wine cellar. Interesting. Now talk to Armo the waitress about what she saw the night of the murder, then talk to the Admiral about investigating the bartender's death and he will agree, albeit unenthusiastically.
Now go to the Eva's interior (save before entering) and you will find Cecille Galard being attacked by 3 guys of the Casper Clan. Kill them all. If she survived, she will tell you about the Mechanic and that he is now imprisoned on the St. Gabriel. If she did not survive the attack, you will have to talk to an old citizen called Orelie Bertine, who will also tell you the same information.
Now you have 2 choices: enter the St. Gabriel and kill everyone (another overpowered fight in the game...and ridiculously difficult unless you follow my strategy below) or the easier path...which is to talk to Armo.
Let's talk about the easier path first. Go talk to the tavern waitress Armo and tell her the Casper Clan is responsible for the death of the bartender. She will offer to help, telling you she has a lot of admirers in the Casper Clan. She will tell you that she will try and lure a member from the Casper Clan outside and you'll have to wait a day to speak to her, whereupon she'll tell you that she has a midnight date with one of the Casper Clan members at the stern of Ceres Smithy. So wait until midnight, go to Ceres Smithy, then kill the poor fool, taking care not to fight too close near the St. Gabriel or the gang members will hear the fight and come outside to help. Report back to Armo and she will try to lure yet another clan member. Rinse and repeat.
Note: if you miss any of the dates, Armo will no longer help you. There is also a bug in that if you wait too long to tell Armo to fix another date, the date will be bugged and the guy will never show, causing Armo to refuse to help you since you "missed" her date.
But here's the interesting part: the third time she tries to lure a member of the gang outside, she will be killed. A member of the Casper clan called Juan Cobo will come up to you right after you kill the third guy and tell you that he bled Hill Brunner (the tavern owner) and now Armo, and that you're going to die. After the conversation, 2 other members will spawn and you'll have to kill them all. BUG: It is important to save before the fight with the third guy, because sometimes the other Casper members from St. Gabriel will join the fight after "hearing the sounds of battle", even though you're not fighting near the St. Gabriel. The only workaround is to lead Juan Cobo all the way somewhere far, far away from the St. Gabriel before initiating conversation.
Now, assuming you completed Dominic Legro's side quest, you can talk to her boyfriend, the jailor Thomas Boyle, and spur him on to take revenge for the death of his girlfriend. The two of you will then attack the Casper Clan together, which should be much simpler now that you've thinned their ranks.
Alternatively, you can save her by killing the second guy close to the St. Gabriel so the gang members will come out and attack you. Fighting on the upper decks is much, much easier than inside the ship, and you should be able to find a nice little choke point on the many ramps and ladders in the City (the ramp on the Carolina is a really good choke point).
If you're itching for a real challenge however, you can follow the step below instead. Warning: the fight below is ridiculously tough...make sure you're prepared!
Strategy for the St. Gabriel Fight
You must go to the St. Gabriel and SAVE before entering and kill everyone inside. The fight inside is extremely tough because you will be facing 15+ enemies and they all love to shoot at you (remember that shots are uninterruptible? Taking 15 shots to the face is not a good thing). In order to win this fight without any cheats, you will need a good medium or light sword (I used a katana for this fight), and a minimum of at least 15 elixirs and/or great wine (for best results, you will want to store all healing items inside the Diffindur chest besides elixirs or great wine so you can easily tap X and it will automatically pot them...or else if your hp has not dropped low enough it will pot for you weaker healing items like medicinal herbs or grapes, which you don't want because you will be taking heavy damage throughout the fight. Alternatively, you can hit enter and manually select the item you want to pot but this might take a longer time and reduce your reaction speed). Once you enter, do not draw your weapon; immediately run past the guards and down the stairs, and then run to the other end and quickly go up the stairs. Fight right at the top of the stairs (this is a great choke point) and it should be easier since they can't shoot you and the fights will more or less be 1 on 1. At this point, your job is to make sure you thin their ranks enough before you run out of stamina. In my game, I managed to kill enough and only 7 were left. You can also save here, but make sure you keep the save just before entering the ship just in case your save doesn't work out. Once you have managed to thin their ranks enough, you will find that you have no stamina to keep up the fight, so run around the deck (to lure them off the stairs back down) and then quickly run back down the stairs again (this part may be tricky since they might block your path). If you successfully managed to run back down the stairs again, congratulations! It gets easier here. You might want to save now after making sure your health is at least 75% (the reason for this is because once you load, they will immediately draw their weapon and shoot you so if your health is insufficient, you will die immediately, making this save useless). Run around the deck regenerating your stamina and constantly potting your health so you don't die, and keep running until your stamina has regenerated to at least 90%. Now, go back up the stairs again to the nice little choke point, and repeat! If you did this right, the fight should be a hell lot easier, and you just successfully did it without cheats!
Anyway, once you kill everybody, search the ship and and you will find a door on the second deck. Enter it and you will reach the upper deck. There's yet another door here so enter it and you'll finally meet the mechanic. He tells you that the city will not survive other storm, because all the ships are toed to the only 3 ships that are run aground but are badly damaged so one more storm will sink all the other ships and everyone will die. He tells you about a Corvette that is suitable to sail and he can free the ship with a winch but he needs a gear but which is at the bottom of the sea. To get it back he has a diving suit that has air for 6 minutes (counter on 400 secs) but first you must talk to the Admiral and tell him that the mechanic's alive and that you have finished off the Casper clan.
So go talk to the Admiral and of course, he won't be too happy since you have ruined his plans but he won't touch you (yet), so go back to the mechanic and save before talking to him and buying his ship. This is because the game randomly generates ship stats, and you're about to get one of the fastest ships in the game for 1.5 million pieces of eight, so make sure you can reload back if you get a ship that has crappy stats (speed will still be insane regardless). If you don't have enough money, you can either borrow from the moneylender (not recommended - scroll all the way to the bottom for more info), or simply run around and loot the chests (don't get caught) around town and sell their loot for lots of gold. Either way, buy the ship from him and you can see your new ship (the Dog of War) in your ship menu, as well as its stats. If you get crappy ship stats, it is recommended to reload and buy his ship again. For information on potential ship stats, read below.
The Dog of War Stats
This section is a brief analysis on the potential viability of the Dog of War. The first thing you want to take note here is that your speed and maneuverability will be off the charts. For a Class 3 ship, the Dog of War is definitely a beast, but against Class 1 ships like the Man-o-war or Battle Man-o-war, the Dog of War loses out in pure firepower, hull and crew. Still, remember that speed is king and so the Dog of War, with the potential to hit nearly 22.00 knots, will still be able to outmaneuver a heavily armed battleship successfully. Below, I have done a brief comparison on the potential stats of each ship, with both ship stats at the higher end in the game, without any upgrades or realistic mod options turned on (vanilla options basically). Stats highlighted in bold is the winner in each category.
Comparison of Dog of War (Class 3) VS. Man-o-war (Class 1):
| Ship Parameter | Dog of War | Man-o-war |
|---|---|---|
| Hull | 8000 | 21,000 |
| Speed | 21.50 | 8.80 |
| Maneuverability | 14.00 | 5.00 |
| Point of Sail | 6.50 | 0.80 |
| Crew | 280 | 890 |
| Max Cannon Caliber | 24 | 48 |
| Number of Cannons | 40 | 102 |
As you can see, the Dog of War loses out in terms of pure firepower, hull and crew, yet win in terms of speed and maneuverability. Thus, a certain tradeoff is required - is speed the main priority? If so, pick the Dog of War. If you need high firepower, go for the Man-o-war instead.
Regardless, in an attempt to gauge the highest and lowest integers of each ship stat, I have done numerous reloads and recorded my findings below (this is with GoF v2.0 mod installed so the vanilla game may have higher stat ranges).
Stat Ranges:
| Ship Parameter | Lowest Range | Highest Range |
|---|---|---|
| Hull | 6000 | 8500 |
| Sails | 450 | 450 |
| Speed | 18.00 | 22.00 |
| Maneuverability | 11.5 | 14.5 |
| Point of Sail | 5.30 | 6.60 |
| Hold | 3500 | 4500 |
| Minimum Crew | 17 | 23 |
| Maximum Crew | 200 | 280 |
| Max Weapon Caliber | 16lbs | 24lbs |
| Max Number of Cannons | 40 | 40 |
| Starting Cannon Caliber & Number | 32lbs / 40 | 32lbs / 40 |
Just try and aim to get the Dog of War with stats as close to the highest range as possible, paying particular attention to Hull (important against Class 1 ships), Speed & Maneuverability (because you might as well take a Class 1 if you have no speed...), Hold (useful for trading) and Maximum Crew (useful overall).
WARNING: You may have noted that the ship guns you start out with are 32lb Cannons, whereas the maximum weapon caliber is only up to 24lbs. This is particularly true for most quest ships, in that their starting cannons will always be of a higher caliber than their "real" maximum caliber, which is shown in the ship stats. In all these cases, you are NOT supposed to remove your ship guns and replace them because the moment you do, you will lose the "ability" to use the higher caliber guns, and will be permanently stuck with your maximum caliber as shown in your ship stats. Thus, in this case, you cannot switch from 32lb cannons to 32lb culverins, and should continue using the starting cannons forever. This also means that for all intents and purposes, the maximum weapon caliber stat is not important and should be ignored.
Diving into the Sea
Lost Ships City (underwater)
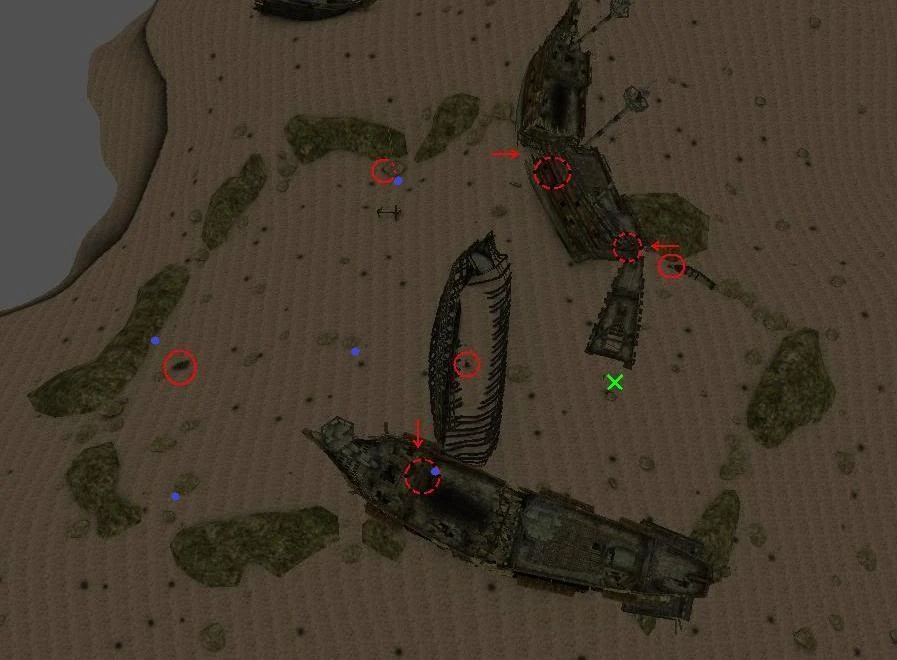
After buying the Dog of War, you are now ready to dive! Each dive costs 30,000 pieces of eight, and the gear is located at one of the blue dots on the map to the right (it's random). Similar to the "find the gem" mission from the moneylender, turning off the grass helps. The gear looks like (and is) a cog - it should be quite easy to spot even at a distance.
The red circles on the map are chests with loot. The green X is where you start and where you must return before the timer expires or you die. Below is a list of notable loot from each container:
- The chest located furthest to the left contains Morgan's Rapier.
- The chest to the right of that - towards the top - contains 2 Ceremonial knives, 1 Ceremonial vessel, and 1 Atlantic warrior (all used for Ascold Quest). Also contains 2 Rat-God Totems (eliminates all rat problems on your ship; give the extra totem to your other ship officers).
- The chest to the right of the above mentioned chest inside the hull of a broken ship contains a bunch of rare but otherwise useless Aztec stuff.
- The two chests closest to the green X and which are very close to each other contain many elixirs, mixtures, great wine, etc.
- The barrel container inside the unfinished hull directly left of the green X contains many candles, used for the Holy Candles quest, if you have not already done so. Keep in mind this is the only place you will find that many candles (the candles in the chest in the store will disappear by this point) so if you have not finished the quest yet, it is wise to do so right now, or stash 400 of the candles before leaving the underwater world forever.
- The chest south of the barrel contains Aztec coins.
Also, there are a few points to consider here:
- You will want to empty your bags as much as you can before descending due to the insane amount of drops you will get. Whatever elixirs, mixtures, and medicinal herbs you have on your body - sell them all. You will get tons here from the chests mentioned above.
- You don't have to collect everything. The most valuable items here are Morgan's Rapier, Aztec Coins, Rat-God totem, and all the healing items you can stuff in your bag.
- Each chest will contain a large amount of gold - around 50k - 360k each. So you will want to loot all the chests even if you don't want the items inside.
- If you surface, you will have to talk to Henrik (the Mechanic) and pay him 30k gold to go underwater again. The 30k is not the hard part - the annoying part is that you can only dive between 10:00 - 17:00. This means you will have to sleep until morning and then hit the speed up key and wait...or you can just use the debugger to pass 5 days immediately.
- A good advice here is to ignore all the crabs and just loot the chests. That way you save a lot of time and hassle, though if you ignore them, they will all chase after you so you can get trapped in by them at narrow areas when you loot the chests.
Once you've found the cog, talk to Hendrik Verdeken (the Mechanic). If you tell him you are done exploring underwater, you will not be able to dive again, so make sure you're really done diving. After that, he will tell you that you'll need to gather supplies for your upcoming trip like food, medicines, powder, ammunition, etc. Follow the instructions below to complete this part without hassle.
- Make sure you have 10 bags of salt, 10 grapes, 3 great wine, and 1 lute. You can find these items in chests all over town and especially on the Diffindur. If you looted all the chests already and don't have these items....you'll never complete this quest unless you cheat (teleporting to the mainland and grabbing the items). If you stashed them all inside your Diffindur chest, now's the time to take all your items out from the chest so you don't have to go back.
- Go to the store and talk to the owner. He will give you the supplies you need for 40,000 gold.
- Go to the church and talk to the priest. He will give you medicines but you must have completed his "Holy Candles" side quest first. Note that there is a bug with this quest: If you have not completed his quest yet and have, for example, already given him 390 candles and only need to give him 10 more, DO NOT speak to him about acquiring the medicines from him or he will request that you complete his side quest first and reset the amount of candles you have already given him to 0.
- Optional: You can talk to Armo the tavern waitress (or her counterpart if she died) to find out who you have to talk to to get ammunition from. She will give you 4 names: Alice Taylor, Orelie Bertine, Lea Toors, and Elise Calvo.
- Go to the Santa Florentina and talk to Lea Toors and Elise Calvo, the Fury to talk to Orelie Bertine, and the Ceres Smithy to talk to Alice Taylor. One of them will ask for 10 bags of salt, and another will ask for 10 grapes, 3 great wine, and 1 lute. The other 2 will ask you to find someone to carry all the ammunition to St. Gabriel. In any case, you can find these people (in case they are not in the location listed) by asking the townsfolk.
- Up to this point, if you did everything right, you should have everything set! Now here comes the fun part. Talk to Admiral Chad Capper and ask him if he can give you powder and weapons. Of course, he will refuse.
- Now talk to John Workman of the militia. He wears a red shirt and looks like an Englishman so he should be easy to spot. He will agree to help you get powder and weapons...if you promise to take him with you. Agree.
- Go back and talk to the mechanic. He will tell you to recruit 15 townsfolk around the city to serve as your crew. Do so! You can ask anyone - male or female - to join your crew, but owners of the store, tavern, etc will refuse.
- IMPORTANT NOTE: You MUST speak to John Workman to "join your crew" (he won't actually count towards the quest objective of 15 men) before the fight with the Admiral or you will not only lose one of the best quest officers in the game, but also make your fight with Chad harder.
- Once you have recruited 15 people, you can technically head back to the St. Gabriel and set sail. However, before doing so, make sure you grabbed any stuff you left behind in the chest on the Diffindur before proceeding, and sell anything you want to sell. Helpful Trick: If you're attempting to carry a ton of items, more than you can carry, you can stash them inside a chest in the St. Augustin so later on you can give them to John Workman when he joins you as an officer. Be careful not to get caught though!
- Now return back to the St. Gabriel and the last man or woman you recruited will be standing in the mechanic's place instead. Speak to him or her and you will find out that the mechanic has been led away by the Admiral's militia, so run back to the St. Augustin. If you have not spoken to John Workman yet, speak to him now as it's your last chance to do so. He can be found around the St. Augustin's main deck, or up the masts.
- Enter the St. Augustin's cabin and the Admiral will run up to you and engage you in a fight. If you did not speak to John Workman about joining you, he will enter the fight as an enemy and fight you alongside the Admiral. In any case, kill the Admiral and his militia, and then talk to John Workman. He will join you as an officer and you can press F2 and assign him as a fighter and pass him the items you placed in the chest if you did so earlier. Note: John Workman can die here.
- Go to the Tartarus. Once you enter, you will have to fight the jailor and Thomas Boyle, if he is still alive. Before you enter the Tartarus, make sure to memorize the masts of Ceres Smithy and the Diffindur - because once you enter the Tartarus and exit it, the entire city will be underwater and you'll have to recognize the Diffindur by its masts alone.
- After killing the jailor and/or Thomas Boyle, talk to Henrik who's sitting in a cage. He will tell you that in order to get to your ship, you need to get to the Diffindur. Now, before exiting the Tartarus, make sure you save!! The moment you exit the Tartarus, you will be swimming against a crazy storm, the waves blowing you off-course nearly 80% of the time.
- Exit the Tartarus and turn right immediately. See the 2 masts in the far off distance? You should be swimming towards those 2 masts in the far off distance. If you memorized the masts of the Diffindur, you should be able to recognize those 2 masts - it's the masts of the Diffindur.
- This is the hard part. What you want to do is keep trying to swim to the Diffindur, and if it pushes you too far off-course, reload and try again. This may take some time but eventually, you'll reach the Diffindur. Remember that you can speed up the game with the "R" button and subsequently the "+" button next to your numpad.
- Swim towards the 2 masts (anywhere between the 2 points is fine) and you will see an option to "enter". Press space and voila! You have successfully escaped the City of Abandoned Ships! You're now in command of the Dog of War, a Class 3 Corvette which is also the fastest ship in the game and, if you talked to John Workman, one of the best quest fighter officers in the game as well. Congratulations!
Location of Keys
Keys to find in order to open the chests around the City of Abandoned Ships (except the Admiral's chest):
3 Simple Keys:
- Reward from the side quest: The Marital Dallies of Poor Alice Taylor.
- Reward from the side quest: The Task of Dominic Legro.
- Lying on the floor of the ship wrecked in two that supports the St. Augustin. You can reach there only by swimming.
1 Average Key:
- Enter the Velasco (one of the 2 side by side doors), and walk straight in between the crate and the barrel in front of you, and pick up the key.
2 Complex Keys:
- Found during the side quest: Life on Esmeralda.
- Inside a chest (small room crowded with clan members) in the St.Gabriel. It is best to wait until you have cleared them out in the main quest before opening the chest.
Side Quests
- Life on Esmeralda
- When you speak to Pedro Hurtado, he will suggest a little scheme to make some easy cash - meet him during the day on the Galleon Esmeralda.
- Go to the ship's sleeping rooms, speak with Pedro and he opens the room. Be prepared for a fight against 3 people. Kill them, rob them all, and grab the complex key on the desk.
- With the complex key, go to the cupboard next to the desk and steal the money inside.
- Get out and split the loot with Pedro and the quest is complete.
- The Marital Dallies of Poor Alice Taylor
- Ask for rumors and you will learn that Max Taylor has been thrown into prison. Alternatively, go to the Tartarus prison and speak to Max Taylor.
- Find Alice Taylor (usually in Ceres Smithy) and offer her your help.
- Speak to Max Taylor in the Tartarus Prison and ask him what he remembers.
- Talk to Admiral Chad Capper about Max Taylor.
- Go to the tavern and talk to Armo the waitress about Taylor.
- Find Gilles Barou and talk to him about Taylor.
- Speak with Admiral Chad Capper again and he will promise to free Taylor.
- Return to Alice Taylor and she will reward you with one simple key.
- Holy Candles
- Offer the priest some help and he will ask you to collect 400 candles.
- If you have a simple key, you can open the chest in the store which contains exactly 400 candles.
- Take as many as you can carry and give them to the priest. This will probably take several trips.
- If you waited too long to do this quest and the chest in the store no longer contains any candles, you will have to wait until a point in the main quest where you can dive underwater to obtain the candles.
- When he has all 400 candles, the quest is complete. You will not actually receive any reward.
- The Task of Dominic Legro
- Dominic Legro (usually on the Galleon Eve) will ask you to bring a bottle of wine to his friend Thomas Boyle, who is a warden on the Tartarus.
- Have a bottle of great wine in your inventory and give it to Thomas Boyle. He will remark about his friend trying to steal his girlfriend.
- Talk to Dominic Legro again, and he will ask you to clear up the misunderstanding. Go back and forth talking to them until the quest is complete. You will receive 1 simple key, and later on in the Main Quest you will be able to ask Thomas Boyle to help you with the Caspers if needed.
- Layton Dexter: Have You Seen This Pirate?
- Find Rojel Haag - you can ask anyone where he is and they will tell you. Speak to him.
- Find Lea Toors (usually in the Galleon Pluto) and speak to her.
- Speak to the Admiral about Layton Dexter.
- Now, go to the Tartarus and then jump off the ship (there's a plank for you to jump off). Turn left immediately and swim a little further, and you'll find a crack that leads inside the ship behind the door that always appear locked from the inside. Go inside this crack. Note: this crack can be difficult to spot if you're still in the storm, since the waves will increase the tide level and obscure the gaping hole!
- You'll see a skeleton here and a chest to the right of him. The skeleton is Layton Dexter, but that's not important. The important thing is the chest itself. Go near the chest and you'll get a new Logbook update.
- Now, talk to the townsfolk and ask them about rumors until you get a log update that the Admiral has lost his key. You now have 2 days to find this key before he does. If you are unable to find it in time, you will not be able to complete the quest. There are tips below which will help you find the key.
- Once you find the key, go back to his chest and loot it, completing the quest. Below is a list of the chest loot.
- 353,002 gold
- Spanish Rapier
- Haudegen or Katana (GoF mod will replace Haudegen with Katana)
- Tanat
- Poleaxe
- 3 Pistols (Beretta, Double-Barreled and Pepperbox)
- Newtonian telescope (Best spyglass in the game)
- 2 White Crystal Skulls (Needed for Ascold Quest to break the contract)
- 2 Pink Crystal Skulls (Needed for Ascold Quest to break the contract)
- 2 Blue Crystal Skulls (Needed for Ascold Quest to break the contract)
- 1 Atlantic Warrior (Needed for Ascold Quest to break the contract)
- 2 Rat God Totems (Eliminates all rat problems on your ship)
- 1 Expensive Cuirass (Best cuirass in the game)
- 1 Ceremonial Vessel (One of the three Aztec items required for Ascold Quest)
- 1 Ceremonial Knife (One of the three Aztec items required for Ascold Quest)
- 3 Achcuahzin Figurines (One of the three Aztec items required for Ascold Quest)
- Other miscellaneous Incan items - some of them rare but all ultimately useless.
- TIP: Searching for this key is a real pain without a little help. To make this easier, save your game as soon as you get the log update and exit. Now go to your game directory and look under \resource\models\items for the following files: keygrand.gm, keymiddle.gm and keysimple.gm. Back them up and then copy the ladder.gm file to each of the key file names. Now when you load the game back up, you're searching for a big ladder standing straight up - should be easier to find than a key. For Gentlemen of Fortune mod users, the key file has already been replaced with that of a blade so this may not be necessary.
- TIP 2: If you still cannot find the key, use the debugger window to help teleport you instantly to the key. Press F11 then type in "LostShipsCity_town, item, item1", then hit "Ok". If you do not teleport to the key, change item1 to item2 (and so on) and try again, and eventually you'll teleport to the key itself, saving you a ton of frustration and time. What this actually does is teleport you to one of the many random locations where the key might spawn. If you haven't enabled the debugger window yet, follow these instructions:
- Open the Age of Pirates 2 folder.
- Open engine.ini and set debugwindow = 0 to debugwindow = 1.
- Close and save the file and then go into the program folder.
- Open up _mod_on_off.h
- Set betatestmode function to on (means your version will change to the Dev version)
- Close and save the file. You're done!
Augusto Brahms, the Moneylender
If you talked to the people around the City of Abandoned Ships, you will hear people mention he's somehow involved with black magic. Well, it turns out that it's actually quite true - he's the disciple of the Aztec God of Death, Mictlantecuhtli. When you borrow money from him, he will mention that you have to pay him 5 times that amount, and he isn't kidding.
Well, as it turns out, once you leave the City of Abandoned Ships, at some point when you walk into a colony's store, you will suddenly be teleported to an Aztec Sacrificial Temple...and then Mictlantecuhtli himself will appear and speak to you. He will demand that you pay him the money owed to Augusto Brahms (so if you borrowed 1 million you will have to pay him 5 million), and if you don't have the gold on hand to pay him, you'll be stuck in that room...forever. On the other hand, if you can pay him off you'll be teleported back to the store and nothing else happens. Hence, it is highly recommended NOT to borrow any money from Augusto Brahms since you can find plenty of gold anyway in the City of Abandoned Ships.
In case you do get stuck, then the only way to get yourself out of that Sacrificial Temple would be to teleport out using cheats. Open the debugger with F11 and type in "Pirates_town, reload, reload1_back" to teleport yourself to the Bermuda Pirate Settlement. If you haven't enabled the debugger yet, the instructions are just above this section.
Based on original from Skodarap's CoAS Site (used with permission). Original is here . Also assisted with the help of this guide here.